You have 0 items in your cart
Transfer size and placement when customizing apparel with heat transfers is an art that can transform ordinary garments into personalized masterpieces. However, achieving exceptional results requires mastering the art of DTF (Direct-to-Film) transfer placement. Understanding the intricacies of sizing and placement is the key to creating visually stunning custom apparel that leaves a lasting impression. In this comprehensive guide, we’ll delve into the world of DTF transfer placement and equip you with the knowledge to elevate your designs to new heights.
DTF stickers provide a unique and versatile way to enhance your designs, offering precision and durability for various creative projects.
Unraveling the Mysteries of DTF Transfer Placement
Before we delve into the practical aspects of DTF transfer placement, let’s unravel some of the essential concepts:
Proper DTF Print Sizes
Proper heat transfer size and placement play a pivotal role in the success of custom apparel. It is essential to understand that different print locations on garments require specific sizing and positioning to achieve visually appealing results. Whether it’s a left chest logo for a corporate uniform or an elaborate design on the full front of a T-shirt, getting the size and placement right ensures that the artwork resonates with the garment’s contours and wearer’s preferences.
Heat Transfer Location
When determining the size of the heat transfer, considerations should be made for the print area – the surface of the fabric that the ink or design will cover. Being mindful of pockets, seams, buttons, and other garment features is vital to prevent any design distortion or unintended overlaps. By adhering to standard size ranges for different print locations, designers can ensure uniformity and consistency across various apparel sizes, from youth to adult options.
Proper Heat Transfer Placement
The placement of the heat transfer is equally critical, as it directly impacts the visibility and balance of the design. Center chest placements draw attention and are ideal for captivating graphics, while left chest placements exude elegance and are often favored for corporate branding. Additionally, sleeve and upper back placements offer unique opportunities for smaller, yet impactful designs. Proper placement not only enhances the overall aesthetics but also ensures that the design complements the wearer’s style and aligns with the intended message of the custom apparel.
DTF Transfer Sizes & Placements: Tips from the Pros
Left Chest Logo Size and Placement
The left chest placement exudes elegance and is a popular choice for corporate branding and uniforms. To achieve a balanced look, keep the design size within the range of 2.5″-4.5″ width and height. Position it approximately 3″ down from the collar, centered at the edge of the collar or 4-6″ from the centerline. Pro tip: Consider printing on pocket tees with the logo above the pocket for a chic touch.

Center Chest Size & Placement
Center chest placement commands attention and is ideal for captivating graphics. Embrace the canvas with designs ranging from 6″-10″ in width and 2″-10″ in height. Position the print 3″ down from the bottom of the collar, centered. Experiment with alternate placements, like the bottom left or right, for a unique twist.
Common Transfer Sizes
Full Front Chest Size & Placement
The full front placement offers a captivating canvas for elaborate artwork. Allow your creativity to flourish within the size range of 10″-12″ width and 10″-14″ height. Position the print 3″ down from the collar for maximum impact. Pro tip: Balance the design with a left chest print on the front for a coordinated look.
Proper DTF Sizes for Shirts and Shirt Decal Sizing
The right size for DTF transfers and shirt decal sizing is quite important for achieving high quality results.
For adult shirts, a common size range for chest prints is 10″-12″ wide, ensuring the design is proportionate to the garment size. When determining the dtf size for shirt designs, it’s essential to match the print area with the dimensions of the garment for optimal results. When considering shirt decal sizing for younger generations of teenagers or children, scaling down to 7″-9″ wide maintains visual balance. It is important to consider shirt size and design complexity when determining the appropriate transfer size and decal sizing to ensure the best appearance on the garment.
DTF Transfer Size Chart
A typical DTF transfer size chart will look something like this:
- Left Chest: 3″- 4″ wide
- Center Chest: 8″-10″ wide
- Full Front: 10″-12″ wide
- Upper Back: 4″- 6″ wide
- Sleeve: 2″-3″ wide
The chart and numbers can be adjusted based on more specific requirements, such as particular design and size specifications.
What Size Should DTF Transfers Be?
Choosing the right size for DTF transfers is crucial for ensuring high-quality results. The ideal dimensions depend on the type of apparel and its intended placement. For instance, chest prints on adult shirts generally range between 10″-12″ wide, while for youth sizes, a more proportionate 7″-9″ width is preferable. Smaller prints, like sleeve or collar placements, require precision to maintain a balanced and professional look. Understanding these size variations helps designers achieve the best visual impact while ensuring durability and longevity of the transfer.
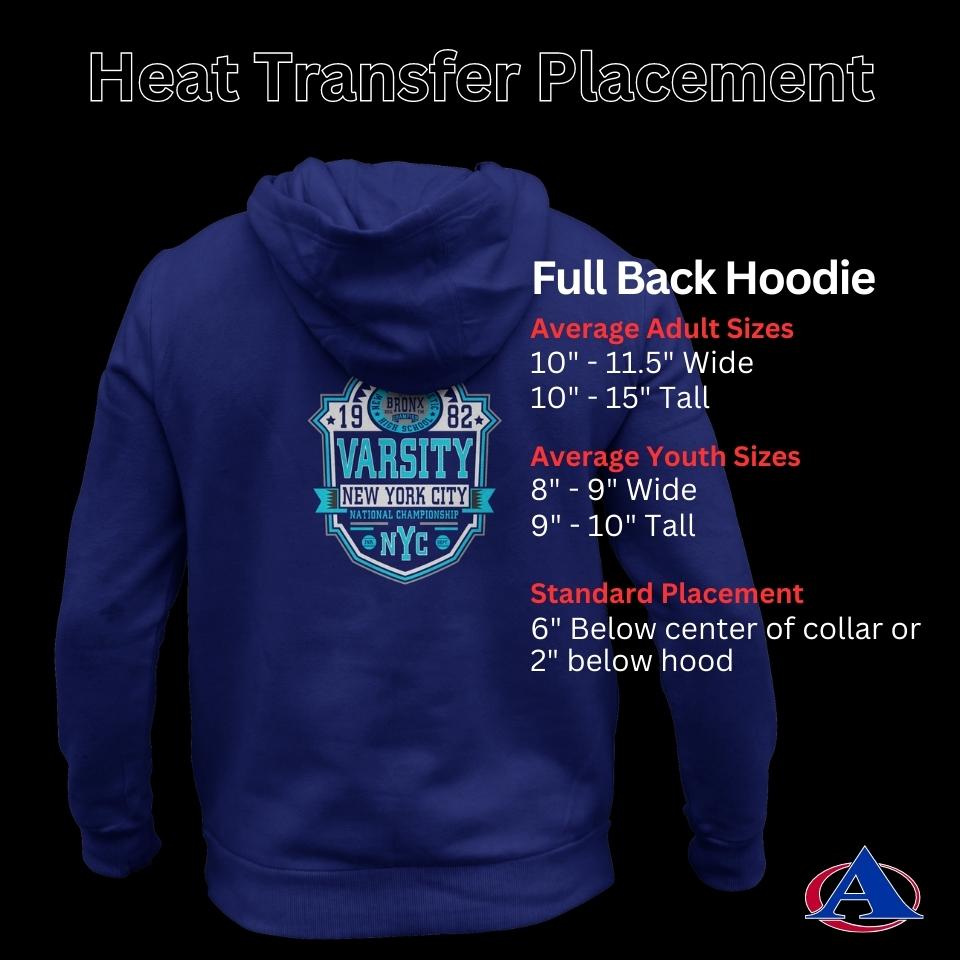
Heat Transfer Vinyl Hoodie Logo Placement Guide
When transferring logos on hoodies, it is recommended to keep the front chest logo size within 10”-12” and position it 3”- 4” down from the neckline. Make sure to take into consideration hood and pocket placement. When it comes to back logos on hoodies, these can be larger up to 12” – 14” wide and positioned 4” – 6” down from the neckline. This positioning will help to improve the visibility of the logo. Finally, when it comes to sleeve logos, these should be kept smaller, around 2” to 3” wide, and placed 1” – 2” from the sleeve’s cuff.

Sleeve Logo Placement & Size
Sleeves present an opportunity to make a statement with smaller, but equally impactful designs. Aim for a size range of 1″-3.5″ in width and height, centered approximately 1″ above the top edge of the sleeve seam. Pro tip: Select the right sleeve for balancing out a left chest print, or choose either sleeve for a standalone impression.

Smaller Prints for a Classy Look
Collar Back Size & Placement
Embrace the sophistication of collar placement with small prints that evoke curiosity. Sizes ranging from 1″-3″ in width and height work wonders, positioned approximately 1″-2″ down from the back collar, centered. Experiment with front placements for a medallion-like effect.

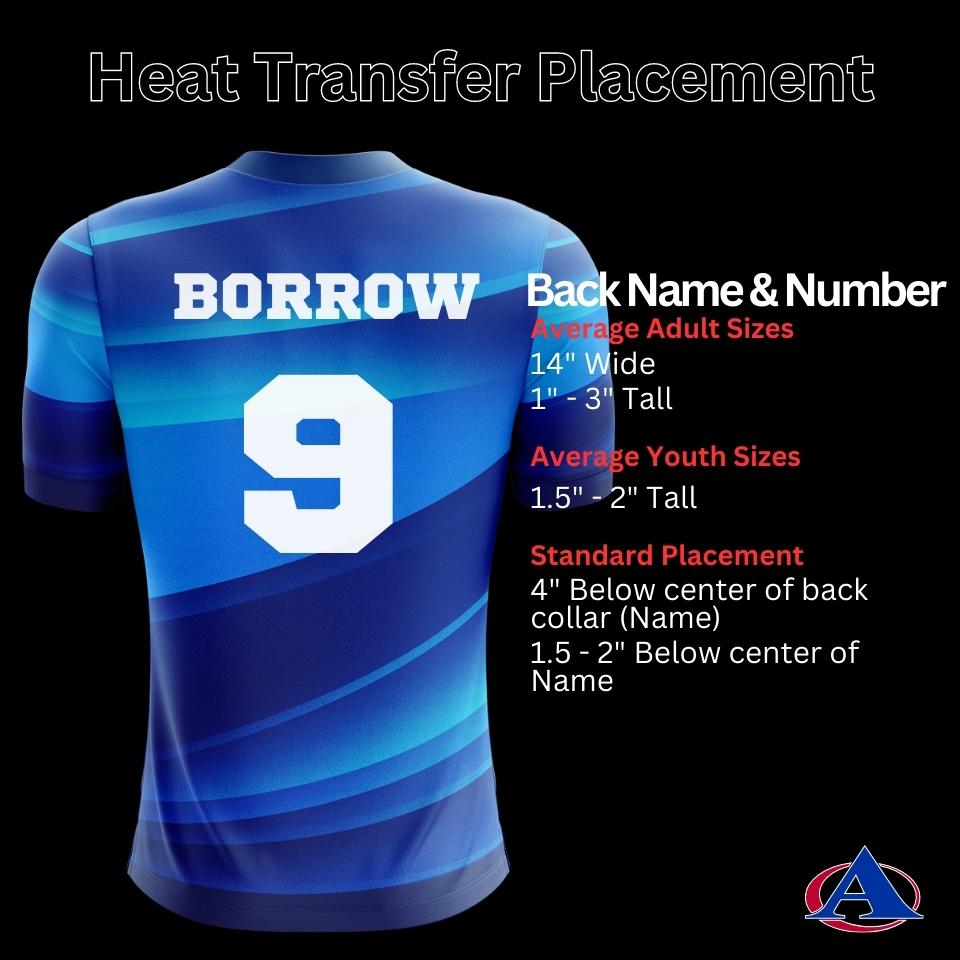
Jersey Name and Number Placement
The upper back placement demands attention, making it perfect for bold statements or large logos. Opt for sizes between 10″-14″ width and 2″-6″ height, centered approximately 4″ down from the collar. Alternatively, explore lower back placements for a unique touch.
Oversize Back Print Transfer Size & Placement – Hoodie Logo Placement & Size
Let your creativity run wild with oversized prints that leave a lasting impression. Aim for 12″-15″ width and 14″-16″ height, centered 2″ down from the collar. Pro tip: Ensure your design fits harmoniously with the garment by testing a printed template before finalizing.
Leg Print Size & Placement
Leg print placement on a pair of shorts offers a stylish and personalized touch to the garment. For optimal results, a standard size of 2″ – 3″ wide and 1.5″ to 2.5″ tall is recommended. Placing the heat transfer design on the side of the leg, near the hemline, creates a visually appealing and balanced look.

Unlocking Your Design Potential
With the principles of DTF transfer placement at your fingertips, you have the tools to unlock your design potential and create awe-inspiring custom apparel. Remember to adapt your designs to different garment sizes, and embrace the synergy between print locations. Whether it’s a subtle left chest logo or a bold full front masterpiece, every placement tells a story. So, get ready to unleash your creativity and elevate your custom apparel game to new heights with DTF transfer placement mastery! Happy designing!
Read about this Blog on Medium!

